
Planting
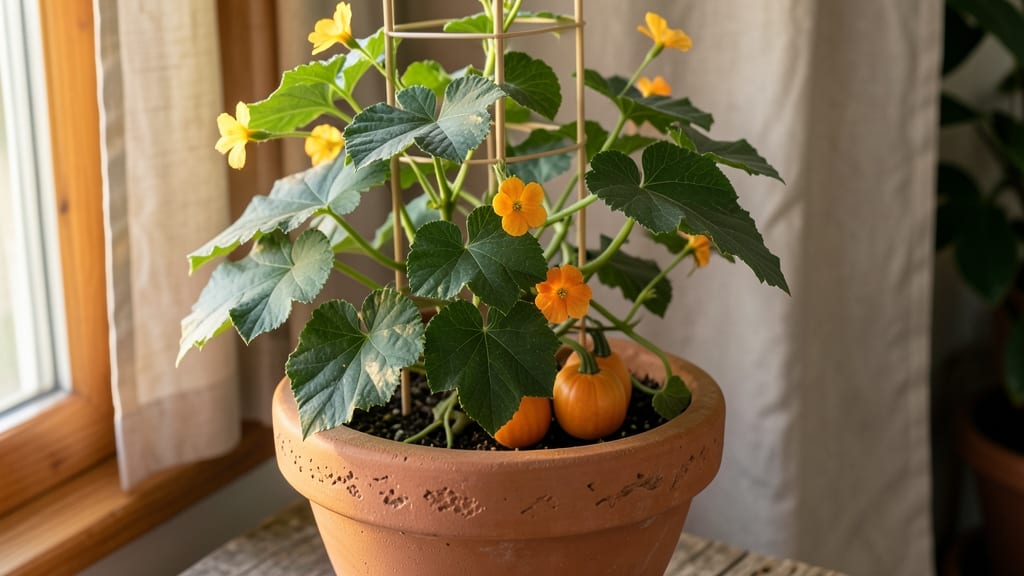
Growing an indoor pumpkin plant from tiny seeds sounds impossible—but I’ve done it twice, and the first harvest was three perfect mini pumpkins by Halloween. 🎃 The secret lies in choosing the right varieties and mimicking summer conditions year-round, even in a small apartment.
Start with compact varieties like 'Jack Be Little' or 'Muskateer,' which thrive in containers and need only 3-5 feet of space.
You’ll need a large pot (at least 5 gallons), well-draining soil, and a sunny spot—either a south-facing window or a grow light on a timer for 12-14 hours daily. Pollination is the trickiest part, so hand-pollinate with a paintbrush if bees can’t visit.
By midsummer, you’ll watch vines sprawl (use trellises or hanging baskets) and flowers bloom. With consistent watering and occasional fertilizer, those tiny seeds turn into edible, ornamental pumpkins in just 80-100 days. The best part? No garden required—just patience and the right setup.
Common challenges—like powdery mildew or leggy growth—have simple fixes, and I’ll walk you through them. Whether you’re growing for fun, fall decor, or fresh pumpkin in January, this method delivers results that surprise even skeptics.
📚 In This Guide
- What you need
- Instructions
- Tips and common mistakes
- Wrapping up and next steps
What you need
- ● Pumpkin seeds – Choose small varieties like Jack Be Little or Miniature Sugar Pumpkin (1–2 seeds per pot).
- ● Growing container – A 5-gallon fabric pot (or larger) with drainage holes (minimum 12-inch diameter).
- ● High-quality potting mix – A well-draining blend (e.g., 60% coconut coir, 30% perlite, 10% compost).
- ● Grow lights – A full-spectrum LED (12–16 hours/day, 12–18 inches above plants).
- ● Watering can – With a gentle spray nozzle for moisture control.
- ● Fertilizer – Balanced liquid fertilizer (10-10-10 or organic fish emulsion, diluted to half-strength).
- ● Trellis or tomato cage (for vining support).
- ● Humidity tray (to maintain 50–70% humidity).
- ● pH tester (ideal range: 6.0–6.5).
- ● Pruning shears (for managing growth).
Step-by-Step guide to growing mini pumpkins indoors
Here's how to nurture tiny, edible pumpkins in containers—no backyard needed.
🌱 Step 1: Select Compact Varieties and Prepare Containers
Choose dwarf pumpkin varieties like 'Jack Be Little' or 'Baby Boo'—they thrive in containers and produce 3-6 pound fruits instead of 20-pound monsters. Each plant needs a 5-gallon container with drainage holes; I use fabric grow bags because they prevent root circling and wick excess moisture.
Fill the container halfway with a lightweight 50/50 mix of potting soil and coconut coir. This blend drains well while retaining moisture—critical since pumpkins have shallow roots. Press the mix down gently to remove air pockets, then add a 1-inch layer of compost on top. The compost provides slow-release nutrients without overwhelming the young plants.
🌱 Step 2: Plant Seeds at Proper Depth and Spacing
Plant 3-4 seeds per container at a depth of 1 inch—any deeper delays germination. Space seeds 6 inches apart in a loose circle. I use a toothpick to make small holes, then drop seeds in one at a time. Cover lightly with additional mix, then mist the surface until evenly damp.
Place the container in a warm spot (70-80°F) with bright, indirect light. A seedling heat mat speeds germination to 7-10 days, but I've seen sprouts in 14 days when using a simple windowsill setup. Watch for cotyledons (first true leaves)—that's your signal to remove weaker seedlings, leaving the strongest one.
☀️ Step 3: Provide Full Sun and Support for Vines
Once seedlings show 3-4 true leaves, move them to a south-facing window or under 14-hour LED grow lights. Pumpkins need 6-8 hours of direct light daily—without it, vines grow leggy and produce small, bitter fruit. I supplement with a 24-inch grow light raised 12 inches above plants to mimic summer sun intensity.
Install a 5-foot trellis or tomato cage immediately. Pumpkin vines can sprawl 10 feet outdoors, but indoors they'll need guidance. Train vines upward using soft twine—never pull or force growth. When vines reach the top, let them cascade down one side of the container for easy harvesting.
💧 Step 4: Water Deeply and Fertilize Regularly
Water when the top 2 inches of soil feel dry, then soak until water runs from drainage holes. Pumpkins hate soggy roots but also need consistent moisture—drought stress causes blossom end rot in developing fruit. I use a self-watering system with a reservoir to maintain even moisture without overwatering.
Feed with a balanced 10-10-10 fertilizer every 2 weeks once flowers appear. The key is phosphorus for blooms—look for dark green leaves and frequent flowers as your signal everything's working. Too much nitrogen? You'll see lush vines but no fruit. Reduce nitrogen to 5-10-10 once pollination begins.
✂️ Step 5: Pollinate by Hand and Harvest at Peak Ripeness
Indoor pumpkins often fail to pollinate naturally, so I transfer pollen with a paintbrush between male and female flowers. Female flowers have a tiny pumpkin at their base; male flowers have long stems. Pollinate morning and afternoon for 2 weeks after first blooms appear. You'll know it worked when fruit begins swelling.
Harvest when the stem dries and papery and the rind can't be dented with a fingernail. For container-grown varieties, this typically happens 80-90 days after planting. Cut stems with 2 inches of vine attached to prevent rot. Cure pumpkins in a warm (80-85°F), dry spot for 10 days to develop flavor and extend shelf life.
Tips & tricks for perfect indoor pumpkin cultivation
Here's what nobody tells you about growing pumpkins indoors—these tricks make all the difference between struggling seedlings and thriving vines.
Container Selection Matters: Fabric grow bags are my go-to because they prevent root circling that can strangle your pumpkin's growth. If you don't have fabric bags, use plastic containers with drainage holes drilled in the bottom—just make sure they're at least 5 gallons. The extra depth gives roots room to spread without becoming root-bound, which is especially critical during the 80-90 day growth cycle. I've seen containers that looked big enough fail when roots hit the sides too soon.
Light Intensity is Non-Negotiable: Those 6-8 hours of direct light in Step 3 aren't just about duration—they're about intensity. If your south-facing window isn't bright enough, supplement with LED grow lights positioned 12 inches above plants. I've had pumpkins grow leggy and produce bitter fruit when light was insufficient, even if the timer showed 8 hours. For best results, aim for 10,000-20,000 lux at plant level—most household windows provide only 1,000-10,000 lux.
Soil Temperature Secret: The warm spot (70-80°F) in Step 2 isn't just about germination speed—it's about creating the right environment for root development. I've found that using a seedling heat mat beneath containers maintains consistent soil temperatures, which is especially helpful if your home has cold floors. Cold soil can delay germination by days, and once roots establish, they need warmth to explore the 50/50 soil mix effectively. For the first 14 days, keep that soil warm to give your seedlings the best possible start.
Pollination Timing Hack: That 2-week morning-and-afternoon pollination window in Step 5 is your best chance for successful fruit set. I've discovered that pollinating right after flowers open (when stamens are fully extended) gives the best results. Use a soft paintbrush to transfer pollen gently—aggressive brushing can damage delicate flower structures. And here's a pro move: if you see more male flowers than female, save some pollen from the first male flowers you pollinate—you can use it to pollinate later female flowers for better efficiency.
Pro Tips for Indoor Pumpkin Plant
- Here's what nobody tells you about growing pumpkins indoors—these tricks make all the difference between struggling s...
- Container Selection Matters: Fabric grow bags are my go-to because they prevent root circling that can strangle your ...
- Light Intensity is Non-Negotiable: Those 6-8 hours of direct light in Step 3 aren't just about duration—they're about...
Frequently asked questions
Got questions about growing your own indoor pumpkin plant? You’re not alone—let’s tackle the most common ones so you can enjoy those tiny pumpkins all year! Here’s what you need to know:
How long does it take for an indoor pumpkin plant to produce fruit?
With the right care, you can expect small pumpkins (like Cinderella or Baby Boo varieties) to form in 80–120 days. Since indoor plants grow slower than outdoor ones, be patient—consistent light (12+ hours/day) and warmth (70–85°F) speed up the process! If flowers appear but don’t set fruit, hand-pollinate with a paintbrush.
Can I grow pumpkins indoors in winter without grow lights?
Technically yes, but it’s a challenge! Natural winter light is often insufficient, leading to leggy, weak plants. If you skip grow lights, supplement with a sunny south-facing window and rotate the pot daily. For best results, invest in full-spectrum LED grow lights (12–16 hours/day) to mimic summer conditions.
Why aren’t my indoor pumpkin flowers turning into pumpkins?
Missing fruit? Check these fixes:
- Pollination: Pumpkins need bees—or you! Gently transfer pollen with a paintbrush between male (long stems) and female (tiny pumpkin at base) flowers.
- Temperature: Keep it warm (70°F+)—cool drafts can prevent fruit set.
- Nutrients: Feed with a balanced fertilizer (10-10-10) every 2–3 weeks once flowers appear.
What’s the best indoor pumpkin variety for beginners?
Start with compact, bush varieties like:
- Cinderella (mini pumpkins, 3–4” wide)
- Jack Be Little (dwarf, 4–6”)
- Baby Boo (fast-growing, 4–5”)
How big should my indoor pumpkin pot be?
Size matters! Use a pot at least 5 gallons for one plant (bigger is better for vining types). Ensure it has drainage holes to prevent root rot. If growing multiple plants, space them 12–18” apart and upgrade to a 10+ gallon container with a trellis for vining varieties.
Wrapping up and next steps
Growing an indoor pumpkin plant is a rewarding journey that brings a touch of autumn magic to your home—no matter the season! With the right container, sunlight, and care, you can enjoy mini pumpkins or lush vines year-round.
Start small, stay patient, and watch your tiny seeds transform into a thriving, harvest-ready plant.
Ready to dive in? Pick your favorite pumpkin variety and get those seeds planted—your future harvest (and Instagram-worthy greenery) are waiting! 🌱✨