
Planting
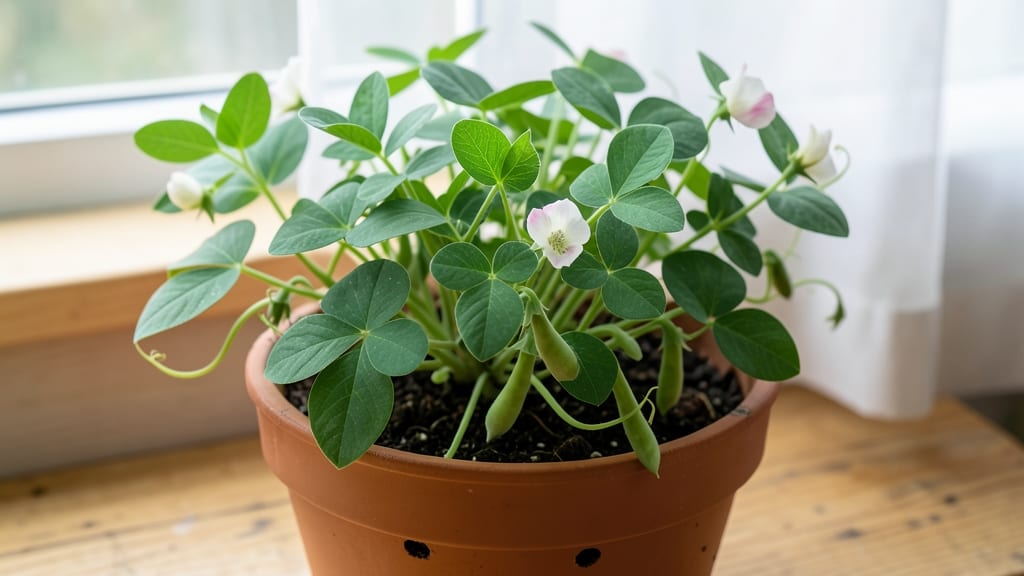
Growing pea plants indoors means fresh, sweet pods without stepping outside—if you nail the sunlight. 🌱 I've grown peas in my kitchen windowsill for years, and the secret isn't fancy grow lights but smart placement and variety choices that thrive in limited space.
The right dwarf varieties like 'Tom Thumb' or 'Sugar Ann' stay compact, while a sturdy trellis keeps vines contained. You'll need well-draining soil, consistent moisture, and temperatures above 50°F—peas are tough but need steady conditions to produce. Most people overlook the trellis, leading to tangled messes and poor yields.
Within 6-8 weeks, you'll harvest tender pods straight from your windowsill. The flavor rivals store-bought, and you avoid the mushy texture of grocery store peas. Just watch for powdery mildew in humid spaces and rotate plants weekly for even growth.
Works for apartments, offices, or sunrooms—just adjust lighting as seasons change. Here's how to set it up right the first time.
📚 In This Guide
- What you need
- Instructions
- Tips and common mistakes
- Wrapping up and next steps
What you need
- ● Pea Seeds: 5–10 sugar snap, snow, or dwarf pea seeds (non-climbing varieties work best for indoor pots). Look for heirloom or organic seeds for extra flavor!
- ● Containers: 1–2 5–10 gallon grow bags or deep pots (minimum 12 inches deep to accommodate roots).
- ○ Optional: Self-watering planters (to reduce maintenance).
- ● Growing Medium: 2–3 cubic feet of lightweight potting mix (avoid garden soil—it’s too dense!). Mix in 20% perlite or coco coir for drainage.
- ● Support: 3–4 bamboo stakes, trellis netting, or small cages (peas need vertical space to climb!).
- ● Basic Tools: Small hand trowel or spoon
- ● Spray bottle (for gentle watering)
- ● Measuring cup (for mixing soil amendments)
- ○ Optional (But Helpful!): Grow lights (LED or fluorescent, 12–16 hours/day if natural light is limited)
- ● pH test kit (ideal pH: 6.0–7.0)
- ● Organic fertilizer (balanced 5-5-5 or compost tea)
- ● Humidity dome or plastic wrap (to retain moisture while germinating)
- ● A sunny spot (south-facing window or balcony) or access to grow lights.
- ● Patience! Peas take 60–90 days to mature from seed.
- ● Consistent care: Peas love cool temps (60–70°F) and daily attention (watering, checking for pests).
Step-by-step instructions for growing peas indoors
Here's how to coax sweet, compact pea harvests from your windowsill—no greenhouse needed.
🌱 Step 1: Choose the Right Containers and Prep Soil
Peas need deep roots, so use 10-inch deep containers for each plant. I swear by fabric grow bags because they prevent root circling and let excess moisture evaporate. Fill each with a mix of 50% potting soil and 50% compost—this gives tender pea roots both structure and nutrients.
Moisten the mix until it feels like a damp sponge—you shouldn't see water pooling at the bottom. Peas hate soggy roots, so always use containers with drainage holes. If yours don't have them, drill a few small holes near the base. I like to place a coffee filter over each hole to keep soil from washing out while still allowing water to drain freely.
🌱 Step 2: Plant Seeds at the Correct Depth and Spacing
Peas germinate best when planted 1 inch deep and 2 inches apart. I use a pencil to make small holes—this keeps spacing consistent and prevents overcrowding. Drop 2-3 seeds per hole, then cover lightly with soil. The reason for multiple seeds is that peas sometimes fail to germinate, and you want at least one strong starter.
Gently pat the soil surface to ensure good seed-to-soil contact. Place a small label near each pot (I use popsicle sticks) to track varieties and planting dates. Pea seeds need consistent moisture to germinate, so water gently with a spray bottle until the soil looks evenly damp. Avoid soaking the surface—you'll see the perfect moisture level when the top inch feels cool to the touch but doesn't feel wet.
☀️ Step 3: Position for Maximum Light and Warmth
Peas need 6-8 hours of direct sunlight daily, but they'll tolerate slightly less if you supplement with a grow light. I place my pea pots on a south-facing windowsill during the day, then move them under a 12-inch LED grow light in the evenings. The light should be close enough that you can barely fit your hand between it and the plant tops—this encourages bushy, compact growth instead of leggy stems.
Keep the soil temperature between 60-70°F for best germination. If your home runs cooler, place pots on a seedling heat mat until sprouts appear. You'll see the first tiny leaves (called cotyledons) emerge in 7-14 days. Once they appear, remove any weak or stunted seedlings, leaving only the strongest plant per pot. This prevents competition for nutrients and ensures bigger harvests later.
💧 Step 4: Water and Fertilize for Healthy Growth
Water pea plants when the top inch of soil feels dry. I check this by sticking my finger into the soil—if it comes out clean, it's time to water. Water deeply until you see moisture trickle from the drainage holes, then let the pot drain completely. Peas are drought-sensitive, so I use a self-watering tray underneath to maintain even moisture without overwatering.
Feed plants every 2-3 weeks with a balanced liquid fertilizer (like 10-10-10) diluted to half-strength. Over-fertilizing leads to lush foliage but fewer peas. You'll know you're doing it right when plants produce 3-4 sets of true leaves and start showing tiny flower buds. This is the stage where you'll begin seeing those classic pea tendrils—don't worry if they don't have anything to climb yet.
🪴 Step 5: Provide Support and Harvest Regularly
Peas need vertical support to grow properly. I use 5-foot tall bamboo stakes or a small trellis placed in each pot at planting time. As soon as you see tendrils appear, gently guide the first vine around the support. Peas will wrap around it naturally, but you might need to tie the main stem loosely with twine if it's not gripping tightly.
Harvest begins when pods are 2-3 inches long and slightly swollen but still firm. I pinch them off with my fingers in the morning when dew is lowest—this prevents the pods from toughening up. Regular harvesting encourages more production. You'll know you're harvesting at the right time when the pods snap easily and the peas inside are plump but still tender. If you miss this window, pods become stringy and less sweet.
Tips & tricks for perfect indoor pea plants
Here's what nobody tells you about growing peas indoors—tricks that'll make all the difference between scraggly stems and a thriving harvest.
Lighting Strategy: Those 6-8 hours of sunlight are non-negotiable, but don't stress if your windowsill gets less. A 12-inch LED grow light on a timer (14-16 hours daily) works wonders. Position it so you can barely fit your hand between it and the plant tops—this creates that perfect "bushy" growth instead of leggy, weak stems. I rotate my pots weekly to prevent uneven growth toward the light.
Germination Secret: The 7-14 day germination window can feel like forever, but here's my trick: Place your planted pots inside a clear plastic bag after watering. This creates a mini greenhouse effect that keeps moisture consistent and speeds up sprouting. Just remove the bag once you see those first tiny leaves appear—usually around day 5-7 in ideal conditions.
Support System: Don't wait until you see tendrils to set up support! Plant your 5-foot tall bamboo stakes or trellis right at planting time. Peas will naturally wrap around them as they grow, but having the structure in place from the start prevents tangled messes. I like to bury the stake about 2 inches deep in the soil for stability, especially if you're growing in lightweight fabric pots.
Harvesting Hack: Those 2-3 inch pods are the sweet spot, but here's how to tell when they're truly ready: Give the pod a gentle squeeze—it should feel firm but yield slightly, like a ripe peach. The peas inside should be plump and snap easily when you pinch them. Harvest in the morning when pods are coolest and most tender. I always harvest every other day to keep production going strong.
Pro Tips for Pea Plant Indoors
- Here's what nobody tells you about growing peas indoors—tricks that'll make all the difference between scraggly stems...
- Lighting Strategy: Those 6-8 hours of sunlight are non-negotiable, but don't stress if your windowsill gets less. A 1...
- Germination Secret: The 7-14 day germination window can feel like forever, but here's my trick: Place your planted po...
Frequently asked questions
Got questions about growing pea plants indoors?
You’re not alone! Here are answers to the most common queries to help you crush your indoor harvest—no green thumb required.
Can pea plants grow well indoors without direct sunlight?
Peas thrive under bright, indirect light (like a south-facing window or a grow light 6–12 inches away). Aim for 12–16 hours of light daily. If leaves yellow or stems stretch (called etiolation), supplement with a full-spectrum LED bulb.
How long does it take for indoor pea plants to produce pods?
Most varieties take 60–90 days from seed to harvest, but dwarf or bush peas (like ‘Tom Thumb’ or ‘Sugar Ann’) mature faster—often in 50–70 days. Temperature matters! Keep your space between 60–75°F for best results.
What’s the easiest way to train pea vines indoors?
Use a small trellis, cage, or even a sturdy wire frame to guide vines upward. No space? Try dwarf varieties or let them trail in a hanging basket. Pro tip: Gently tie vines to supports with soft twine every 3–5 days to avoid damage.
Why are my indoor pea leaves turning yellow or spotted?
Yellow leaves often signal overwatering or nutrient deficiency. Check soil moisture—peas hate soggy roots! Spots could mean powdery mildew (boost airflow) or pests (wipe leaves with neem oil). Fix it fast: Adjust watering (let soil dry slightly between drinks) and rotate plants weekly for even light.
Can I grow other compact veggies indoors like peas?
Yes! Try these low-space superstars:
- Microgreens (ready in 1–2 weeks!)
- Radishes (fast-growing, 30 days)
- Lettuce (cut-and-come-again varieties)
- Bush beans (like ‘Blue Lake’)
- Herbs (basil, parsley, cilantro)
Wrapping up and next steps
Growing pea plants indoors isn’t just possible—it’s a rewarding way to enjoy fresh, homegrown harvests year-round with just a little sunlight and creativity! 🌱 Whether you’re a beginner or a seasoned plant parent, these compact, space-saving hacks prove that even small windowsills can yield big results.
Start small, experiment with containers, and soon you’ll be savoring sweet peas straight from your indoor garden.
Ready to take the next step? Pick your favorite variety, gather your supplies, and plant your first seeds today! Share your progress or ask questions in the comments—we’re here to cheer you on every step of the way. 🌟